Inbound Stock: Adding New Inventory to Existing Quantities
Learn how to use OneCart's Inbound Stock feature to add new inventory to your existing quantities when receiving stock from suppliers.
Help Article
Last updated Dec 6, 2025
5 min read
Inbound Stock: Adding New Inventory to Existing Quantities
Inbound Stock is OneCart’s method for adding new inventory to your existing stock levels. This feature is designed for receiving shipments from suppliers, restocking, and any scenario where you need to increase your current inventory quantities.
How Inbound Stock Works
Inbound Stock adds the quantities you specify to your existing stock levels.
Example:
- Current stock in OneCart: 55 pieces
- Excel spreadsheet shows: 10 pieces (inbound)
- Calculation: 55 + 10 = 65 pieces
- Result: OneCart quantity becomes 65 pieces
You don’t need to calculate the final quantity yourself - OneCart automatically adds the inbound amount to whatever stock you currently have.
When to Use Inbound Stock
Inbound Stock is perfect for:
- Receiving supplier shipments - Add newly delivered inventory
- Restocking from warehouse - Add transferred inventory
- Manufacturing completion - Add newly manufactured products
- Return to inventory - Add products returned by customers
- Stock transfers - Add inventory moved between locations
- Purchase order receipts - Add inventory from completed orders
Key Advantage
No calculations needed! You just specify the amount you’re receiving, and OneCart handles the math:
- You receive 50 pieces from your supplier
- Just upload “50” in your Inbound Stock file
- OneCart adds it to whatever quantity you already have
- No need to look up current stock or calculate totals
Prerequisites
Before using Inbound Stock, ensure you have:
Step-by-Step Instructions
Step 1: Navigate to Inbound Stocks
- Navigate to View Inventory → Inbound Stocks: https://app.getonecart.com/inbound_stocks
- Click on ‘New Inbound Stock’
- Click ‘Download sample’ to get the correct file format
Step 2: Prepare Your CSV File
The downloaded sample file has two columns:
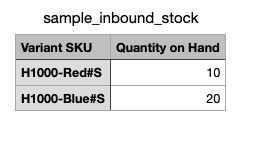
- Column A - Variant SKU: Your OneCart SKU codes (must match exactly)
- Column B - Quantity on Hand: The number of newly arrived items for each SKU
Important notes:
- Variant SKU: Use the exact SKU from your OneCart Item Master
- Quantity on Hand: Enter the amount you’re adding (not the final total)
- File format: Save as .csv format when complete
Step 3: Fill Your CSV File
Fill in your inbound stock data:
- Column A: Enter your SKU codes exactly as they appear in OneCart
- Column B: Enter the quantity of new stock you received
- Save the file as CSV format
Step 4: Upload Your CSV File
- Back in OneCart, click ‘Choose File’
- Select your prepared CSV file
- Name your upload under the ‘Name’ field (e.g., “Supplier delivery Dec 6”)
- Click ‘Save’
If successful, you’ll see this confirmation message:
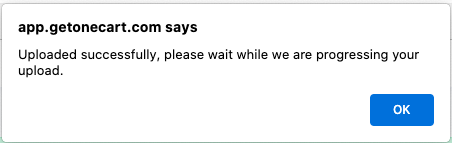
Click OK to continue.
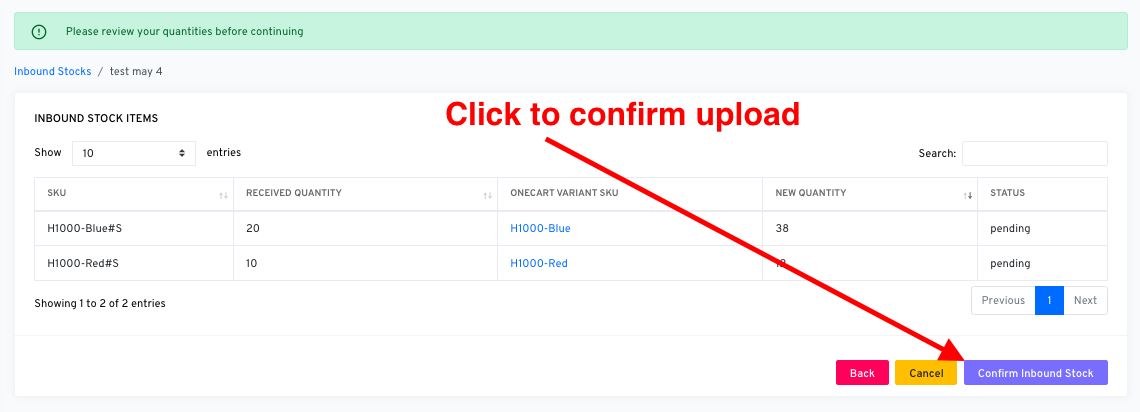
Step 5: Review Upload Status
Your upload will appear with ‘pending’ status:

Step 6: Confirm Inbound Stock
- Click ‘View’ next to your pending upload
- Click ‘Confirm Inbound Stock’
Step 7: Automatic Calculation and Sync
Once confirmed, OneCart will:
- Auto-calculate new quantities: Existing quantity + Inbound quantity = New total
- Push the updated quantities to all connected platforms (for SKUs toggled ON)
- Update your inventory in real-time
The key benefit: You don’t need to calculate final quantities yourself - OneCart does the math automatically!
Video Tutorial
You can watch a short video demonstration of the OneCart Inbound Stock process:
If the video doesn’t load above, you can also view it directly on Loom.
Real-World Examples
Supplier Delivery
- Scenario: You receive 100 units of WIDGET-001 from your supplier
- Current stock: 25 units
- Inbound file: WIDGET-001, 100
- Result: 25 + 100 = 125 units
Manufacturing Completion
- Scenario: You finish producing 200 units of CUSTOM-002
- Current stock: 0 units
- Inbound file: CUSTOM-002, 200
- Result: 0 + 200 = 200 units
Multiple SKUs Delivery
Best Practices
Documentation
- Record supplier information in your internal notes
- Save purchase orders that correspond to inbound stock
- Track delivery dates for reference
- Note any discrepancies between ordered and received quantities
Verification
- Count physical inventory before updating OneCart
- Verify SKU codes match your supplier documentation
- Double-check quantities against packing slips
- Test with small batches first if handling large uploads
Timing
- Update immediately after receiving and counting inventory
- Don’t delay updates to avoid overselling
- Coordinate with your team to avoid duplicate entries
- Update during business hours when you can monitor results
Troubleshooting
Negative Results
If your calculation results in negative inventory:
- Check if you meant to use Outbound Stock instead
- Verify you entered the correct current stock levels
- Ensure you’re not accidentally subtracting instead of adding
SKU Not Found
- Verify SKU codes match exactly with your Item Master
- Check for typos or extra spaces
- Ensure SKUs exist in OneCart before uploading
Quantities Not Adding Correctly
- Confirm you’re using Inbound Stock (not Bulk Upload)
- Check that quantities are positive numbers
- Verify your Excel file formatting
Alternative Methods
If Inbound Stock isn’t right for your needs:
Related Articles
Need help with other inventory update methods? Check our complete guide to all four inventory update methods for more options.