Bulk Update Prices From a File
Change the regular selling price of many SKUs at once by uploading a simple file. OneCart applies the new prices to every shop you select and pushes them to the marketplace. Here's the step-by-step, including what the file looks like and how to read the results.
Help Article
Last updated Sep 3, 2026
5 min read
The Bulk Update Prices tool lets you change the regular retail (selling) price of many SKUs in one go. You upload a file of SKUs and prices, pick the shops to update, and OneCart pushes those prices out to the marketplace for you. It’s the fastest way to reprice a large catalogue without editing listings one at a time.
This updates the normal selling price shown to buyers. It is not for promotional or strikethrough pricing. To run a sale or discount campaign, use Creating Bulk Discounts in OneCart and see What is Special Price? instead. If you only need to change one or two prices, Single Price Updates is quicker.
Open the tool directly at https://app.getonecart.com/bulk_prices, or from the left sidebar go to E-Commerce Listings > Manage Listings > Bulk Update Prices.
Before you start
- The SKUs you want to reprice already exist in OneCart, and are matched to listings on the shops you want to update.
- Have your new selling prices ready, matched to the Variant SKU you use in OneCart.
- The same price file is applied to every shop you select. If a SKU is priced at 19.99 in your file, each selected shop’s listing for that SKU is set to 19.99.
What the file looks like
Your file needs just two columns, with the headers in the first row:
| Variant SKU | Price |
|---|
| ACME-TSHIRT-BLK-M | 19.99 |
| ACME-TSHIRT-BLK-L | 19.99 |
| ACME-MUG-WHT | 8.50 |
- Variant SKU: the SKU exactly as it appears in OneCart.
- Price: the new selling price as a plain number, for example
19.99. Don’t include currency symbols like $.
A few things worth knowing about the file:
- CSV and Excel both work. You can upload a
.csv, .xlsx, or .xls file. You no longer need to Save As CSV first, just upload your Excel file directly. - The first row must be the headers (
Variant SKU and Price). - Extra columns and column order are fine. OneCart reads the
Variant SKU and Price columns by name and ignores the rest, so you can upload an export that has other columns in it.
You don’t have to build the file from scratch. The upload form has a View Sample link (sample_bulk_price.csv) you can download and fill in.
Step-by-step
1. Open Bulk Update Prices
Go to https://app.getonecart.com/bulk_prices. This page lists your previous price uploads, each with its status and a results summary. Click New Bulk Price Upload to start a new one.
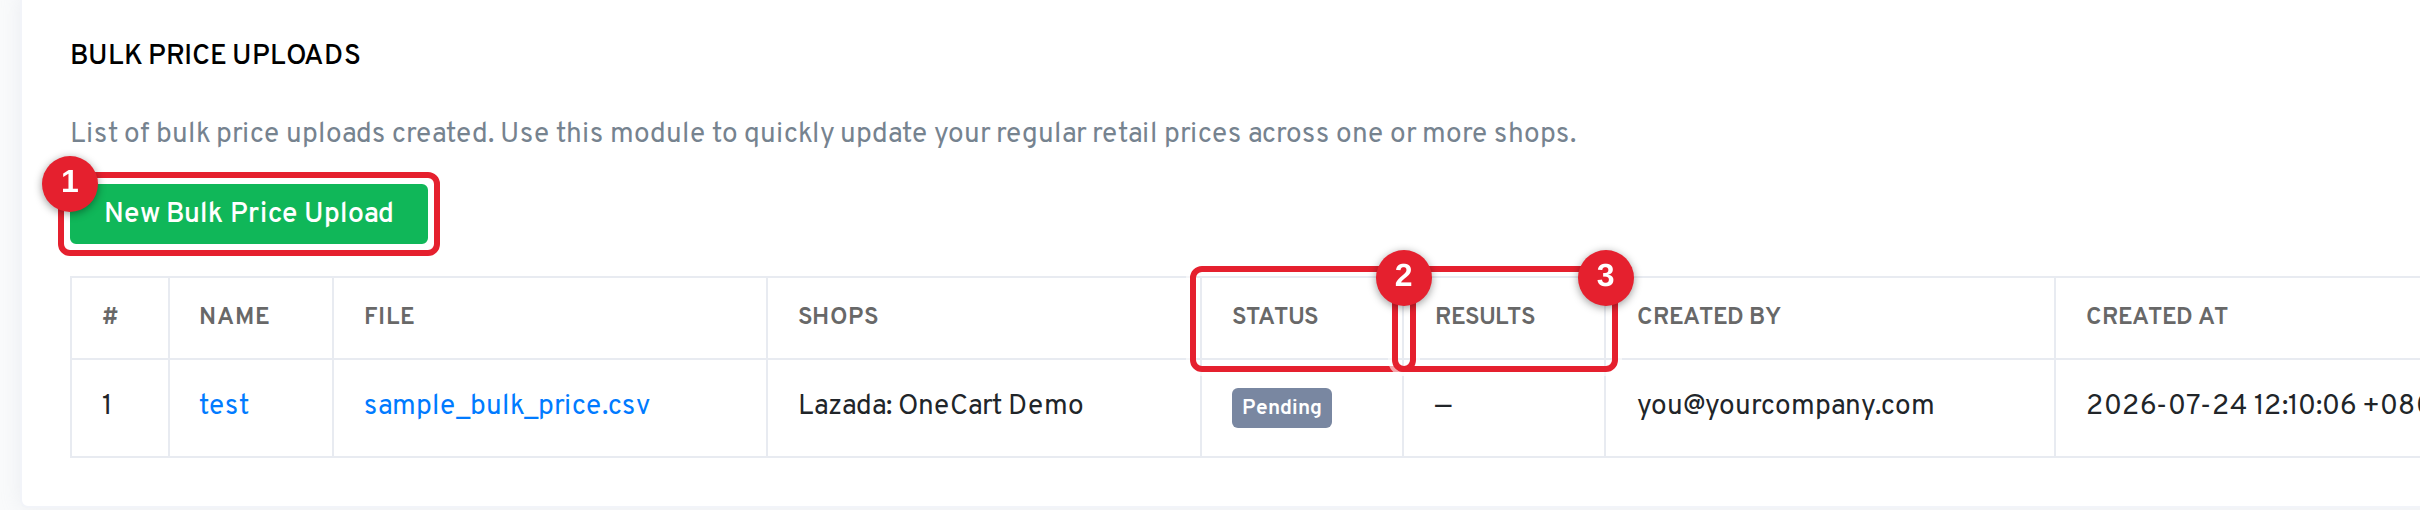
- New Bulk Price Upload: start a new upload.
- Status: where each upload is in processing (pending, processing, complete, or failed).
- Results: a per-upload summary of how many rows were updated and how many had errors.
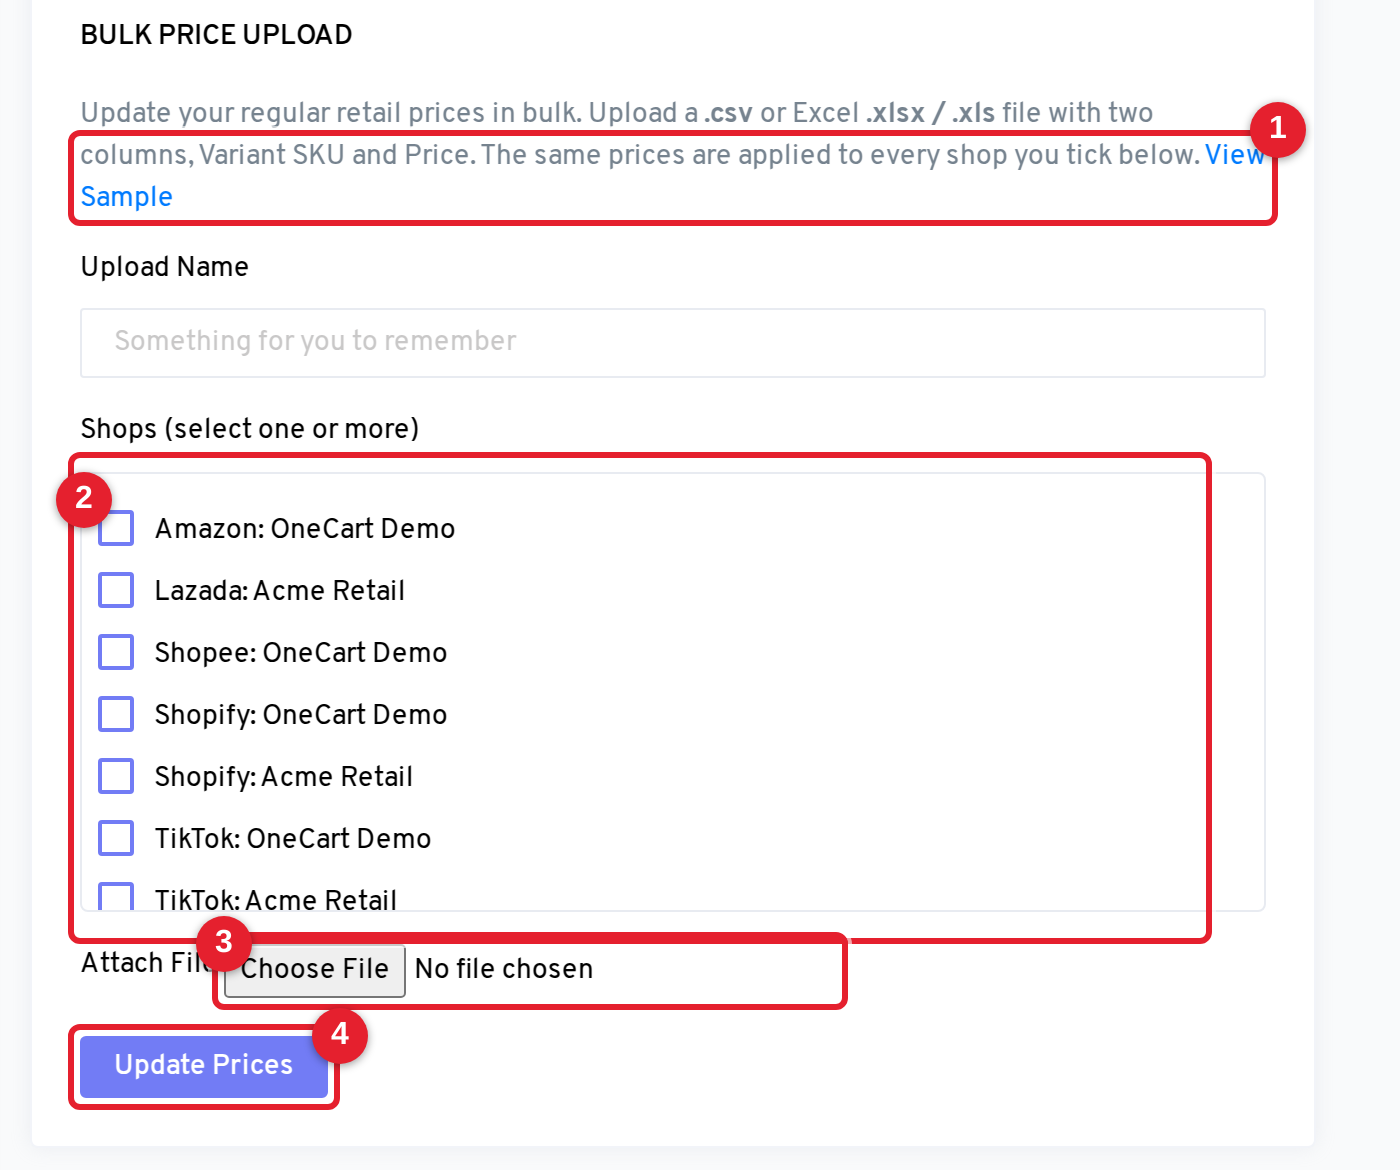
- View Sample: download the sample file to see the exact format, then fill in your own SKUs and prices.
- Shops (select one or more): tick every shop you want repriced. The same price file is applied to all of them. Supported platforms include Shopee, Lazada, Qoo10, WooCommerce, Shopify, TikTok, Magento, Zalora, and Amazon.
- Attach File: choose your completed
.csv, .xlsx, or .xls file. - Update Prices: submit the upload.
You can also give the upload a name (“Something for you to remember”) so it’s easy to find in the list afterwards.
3. Let it process
Processing runs in the background, so you don’t need to stay on the page. Your upload appears in the list on the Bulk Price Uploads page with a status that moves from pending to processing to complete (or failed). OneCart also emails you when it’s done.
4. Check the results
When the upload finishes, open it to see the results summary: how many rows were updated and how many had errors. Review any errors and, if needed, fix those rows and upload the file again.
Common row errors and how to fix them
If some rows don’t update, the results will tell you why. The usual causes are:
- “SKU doesn’t exist in OneCart”: the Variant SKU in your file isn’t in your Item Master, or it’s spelled differently. Check the SKU matches exactly, then re-upload just those rows.
- “No matching listing found on
<platform>: <shop>”: the SKU exists in OneCart but isn’t linked to a listing on that shop, so there’s nothing to reprice there. Match or create the listing first. See Matching Your Platform Listings in OneCart. - Invalid price: the price isn’t a plain number. Remove
$ and any other symbols and use a value like 19.99.
Good to know
- This changes the regular selling price, not a promo price. For sale or strikethrough pricing, use Creating Bulk Discounts in OneCart or Special Price.
- The same file goes to every selected shop. If you need different prices per shop, upload a separate file for each shop with that shop’s prices.
- RedMart is separate. RedMart prices are uploaded with their own tool. See How to Upload RedMart Prices in OneCart.
- You can re-upload any time. When prices change, upload a fresh file and OneCart pushes the new prices again.
Related articles
Still have questions about repricing in bulk? Reach out to us at hello@getonecart.com and we’ll be glad to help.